Wednesday, November 30, 2011

Getting Phone Gap to work with JQuery Mobile

This is just a quick summary of how to get a simple kind of Hello World app that uses both PhoneGap and JQuery Mobile up and running. Note that I'm going to be doing this on a Mac, using Xcode4. You should be able to do this using, for example, Eclipse on a PC, but the details will vary slightly.

The first thing to do is go ahead and download the latest version of PhoneGap from their site, and install it. Once you do that, you can follow the instructions at the Phone Gap site on how to run their hello world app (http://phonegap.com/start).

To paraphrase, you basically, open XCode, and there's a Phone Gap project icon available. You can go ahead and create a new project. (Important - don't turn on arc for starters, that messes something up, I think it was something to to with jQuery Mobile)

Once that's done, *run the project*. This creates a www folder in the project folder you just created.

Copy the www folder from finder, without copy and as as a reference into the project folder.

When you run the project again, you might have an issue with the default device being incorrect. Change it to the one you usually use by selecting it on the scheme in the upper left. In my case, with Xcode 4.2, it's usually iPhone 4.2

The successful result looks like this:


Ok, that's phone gap. But we wanted to see a combination of jQueryMobile and Phone Gap. That's where this blog post comes in:

http://wiki.phonegap.com/w/page/36868306/UI%20Development%20using%20jQueryMobile

You can read up on it, then download the demo source from here:

http://wiki.phonegap.com/w/page/36868306/UI%20Development%20using%20jQueryMobile#DownloadDemoSource

Once you have downloaded and unzipped that app - *don't try opening the project*. It contains assumptions about the locations of javascript files that keep it from completing.

Instead, delete the "www" folder including files from your previously created PhoneGap project. Then copy the "www" file from the jQuery downloaded folder into your project from finder. I think it's better to copy and reference additional folders.

Then, run the app. You should see something like this:


But - there are a couple of "gotchas". It turns out that a security feature has been added to Phone Gap which requires that you provide a list of urls your app will be accessing in "PhoneGap.plist". For example, if accessing google, you'd want to specify "*.google.com". Any other form I tried didn't work.

In the case of the what text to enter, for the search, I think the only one that works is "firefox". But, if you enter that, you get a nice, long list of alternate browsers:


I'll leave getting the second button to say something more than "This app rocks" up to you ;)

Monday, November 21, 2011

jQuery Mobile - first steps

Having just finished chapter 3 of Jonathan's Stark's excellent tutorial on building iPhone apps without objective C,

(http://ofps.oreilly.com/titles/9780596805784/ch03_id35816678.html)

I then started in on Chapter 4. However, it works with jQTouch. jQtouch seems great, but apparently it's no longer being actively developed and seem to have been more or less supersceded by jQuery Mobile. There are also a number of other platforms out there, but I'm going to focus on jQuery mobile for a couple of reasons:

1) It seems to be quick to learn
2) I want to get more familiar with javascript in general.

There's a nice little summary that gives a clear, quick overview of its features here:
http://qpants.wordpress.com/2010/10/19/jquerymobile-review/

So, going to the jQuery mobile page, let's walk through the intro tutorial. It's at http://jquerymobile.com/demos/1.0/docs/about/getting-started.html


Getting Started with jQuery Mobile

jQuery Mobile provides a set of touch-friendly UI widgets and an AJAX-powered navigation system to support animated page transitions. Building your first jQuery Mobile page is easy, here's how:

Create a basic page template
Pop open your favorite text editor, paste in the page template below, save and open in a browser. You are now a mobile developer!

Here's what's in the template. In the head, a meta viewport tag sets the screen width to the pixel width of the device and references to jQuery, jQuery Mobile and the mobile theme stylesheet from the CDN add all the styles and scripts.

In the body, a div with a data-role of page is the wrapper used to delineate a page, and the header bar (data-role="header") and content region (data-role="content") are added inside to create a basic page (these are both optional). These data- attributes are HTML5 attributes are used throughout jQuery Mobile to transform basic markup into an enhanced and styled widget.


Here's the template:


<!DOCTYPE html>
<html>
<head>
<title>My Page</title>
<meta name="viewport" content="width=device-width, initial-scale=1">
<link rel="stylesheet" href="http://code.jquery.com/mobile/1.0/jquery.mobile-1.0.min.css" />
<script type="text/javascript" src="http://code.jquery.com/jquery-1.6.4.min.js"></script>
<script type="text/javascript" src="http://code.jquery.com/mobile/1.0/jquery.mobile-1.0.min.js"></script>
</head>
<body>

<div data-role="page">

<div data-role="header">
<h1>My Title</h1>
</div><!-- /header -->

<div data-role="content">
<p>Hello world</p>
</div><!-- /content -->

</div><!-- /page -->

</body>
</html>


A couple of key points - the whole app is in a single page. Html5's "data-role" is used in "div" declarations to distinguish between pages, headers, content etc.

So, let's bring this up in safari and see how it looks. Btw, I just learned a nice trick for displaying static html files in the iOS simulator safari browser - just drag and drop in into the simulator. There's no need even to start safari!

I wanted to show how it looks, but I'm having trouble pasting the image, I'll try to add it later.

Continuing:

Add your content
Inside your content container, you can add all any standard HTML elements - headings, lists, paragraphs, etc. You can write your own custom styles to create custom layouts by adding an additional stylesheet to the head after the jQuery Mobile stylesheet.


Make a listview
jQuery Mobile includes a diverse set of common listviews that are coded as lists with a data-role="listview" added. Here is a simple linked list that has a role of listview. We're going to make this look like an inset module by adding a data-inset="true" and add a dynamic search filter with the data-filter="true" attributes.


<ul data-role="listview" data-inset="true" data-filter="true">
<li><a href="#">Acura</a></li>
<li><a href="#">Audi</a></li>
<li><a href="#">BMW</a></li>
<li><a href="#">Cadillac</a></li>
<li><a href="#">Ferrari</a></li>
</ul>


Ok, so let's add this to the html just created under the div with the "content" role.

Very nice - a cool, iPhone-ish looking listview which includes a search. The search works out of box, although not quite as you'd expect - it finds any items that contain the string entered, as opposed to starting with it.

Continuing on:

Add a slider
The framework contains a full set of form elements that automatically are enhanced into touch-friendly styled widgets. Here's a slider made with the new HTML5 input type of range, no data-role needed. Be sure to wrap these in a form element and always properly associate a label to every form element.

<form>
<label for="slider-0">Input slider:</label>
<input type="range" name="slider" id="slider-0" value="25" min="0" max="100" />
</form>


Nice - you get a pretty little slider with a label whose text changes as you move the slider.


Next:

Make a button

There are a few ways to make buttons, but lets turn a link into a button so it's easy to click. Just start with a link and add a data-role="button" attribute to it. You can add an icon with the data-icon attribute and optionally set its position with the data-iconpos attribute.


<a href="#" data-role="button" data-icon="star">Star button</a>


Nice - a button that take you to the specified link. In this case, it's just the same page, but you could paste an address for anywhere.

Next - themes!

Play with theme swatches

jQuery Mobile has a robust theme framework that supports up to 26 sets of toolbar, content and button colors, called a "swatch". Just add a data-theme="e" attribute to any of the widgets on this page: page, header, list, input for the slider, or button to turn it yellow. Try different swatch letters in default theme from a-e to mix and match swatches.

Cool party trick: add the theme swatch to the page and see how all the widgets inside the content will automatically inherit the theme (headers don't inherit, they default to swatch A).

<a href="#" data-role="button" data-icon="star" data-theme="a">Button</a>


Very nice. Different colored buttons, and themes.


So, this was a nice little tutorial on some of the basics of jQuery Mobile. I'm going to try do a static page on it first. Later on, I'll check it for database access.

Saturday, November 19, 2011

Welcome to my blog! If you've stumbled across this in your travels on the internet, please take a moment click on an ad - or two! You might see something you like, *and* it helps finance the blogosphere. Think of the children!

Ok, after a couple of days hiatus, we're ready to tackle Jonathan Stark's phone-gap tutorial again. We were about 2/3 of the way through the murderous part 3 when we left off.

The next step is "Adding an Icon to the Home Screen". Let's see what this does. It's essentially just adding a 57 x 57 file named "apple-touch-icon.png" to your public_html directory. It lets the user put an app for your mobile web app onto his icons along with the regular app from the safari browser (by hitting the middle icon on the bottom of the browser and selecting "add to home screen". Pretty nifty.

Next up is "Full Screen Mode". All you need to do for this is add this line:


<meta name="apple-mobile-web-app-capable" content="yes" />


to the head section of "iphone.html". It gives you extra space on the web display on the hijacked links.

Note, you need to delete and re-add the icon you just added to your home screen to make it work. It should look something like this:


Ok, the next step is to change the color of the status bar:


<meta name="apple-mobile-web-app-status-bar-style" content="black" />

non-escaped html:


Finally, we can add a startup graphic with this:

<link rel="apple-touch-startup-image" href="myCustomStartupGraphic.png" />

non-escaped html:


And you get the loading graphic...and we're done!

Friday, November 18, 2011

Solving XCode4.2 upgrade warnings; importing flurry analytics; etc.

Welcome to my blog! If you've stumbled across this (or any blog) in your travels on the internet, place take a moment click on an ad -or two! You might see something you like, *and* it helps finance the blogosphere. Think of the children.

Ok, well, today, I've just released my first free version of my app. It give the first 100 for free, but you need to pay for the rest. But, I need to make it clearer when you run out, like an alert. As it stands now, you just have to keep repeating, trying to figure out why you're stuck. I went through 3 of the same quiz before I finally got it, and I wrote the program.

So, the goal of today is to put in an alert. I also want to put in some metrics.

Woah - thank God. A gang of like 20 high school girls just decided *not* to sit right next to me. That was a close call.

Oh, yeah, I almost forgot. Since I upgraded to Xcode 4.2, I've been getting warnings from the Reachability class:


declaration of '…' will not be visible outside of this function warning


Stackoverflow as usual has the solution:


Add #import <netinet/in.h> in Reachability.h to get away with this


Ok, there are still a couple of other warnings.

I'm getting an incompatible pointer warning on this:

UIScrollView *view = [[UIView alloc] initWithFrame:CGRectMake(0, 0, 0, 0)];

If I click on the warning, it takes me to the class itself, which returns a UIView. So casting it to a UIScrollView eliminates the problem:

UIScrollView *view = (UIScrollView *) [[UIView alloc] initWithFrame:CGRectMake(0, 0, 0, 0)];


Ok, good. Now, the last warning is

"initwithframe reuseidentifier is deprecated" from this statement:


cell = [ [[UITableViewCell alloc]
initWithFrame:CGRectZero reuseIdentifier:@"cell"] autorelease];


The fix, again from stackoverflow, is this:


cell = [[[UITableViewCell alloc] initWithStyle:UITableViewCellStyleDefault reuseIdentifier:@"cell"] autorelease];


Whew! That was pain.

Ok, where was I? Ok, first, let's throw in the alert.

Here's where I want to throw it in:


if (reachedEndOfFreeWords) {
if ([Utils isFreeVersion]) {
self.upperCongratsMessage.text = @"Free vocabualary completed!";
self.congratsMessage.text = @"Click the buy button below for the rest!";

=========> create the alert here! <=====================

}
else {
self.congratsMessage.text = @"You have completed *all* the words!";
}
}


Ok, let's get some alert code. Where do we have it? Hmm...right - there's an alert if you don't get all the question right.

Ah, here it is:


// construct a message letting the user know how many were wrong
NSString *title = [NSString stringWithFormat:@"You answered %d out %d correctly",appState.correctAnswers, [appState.shuffledQuestionDictKeyList count]];

UIAlertView *alert = [[UIAlertView alloc] initWithTitle:title
message:@"To advance, all answers must be correct"
delegate:nil
cancelButtonTitle:@"OK"
otherButtonTitles:nil];

[alert show];
[alert release];


So, let's make this look like this:


// construct a message to the user
NSString *title = [NSString stringWithFormat:@"Press the
\"Buy\" button below for the rest of the questions!";

UIAlertView *alert = [[UIAlertView alloc] initWithTitle:title
message:@"Congratulations - free questions completed."
delegate:nil
cancelButtonTitle:@"OK"
otherButtonTitles:nil];

[alert show];
[alert release];


Ok, with that taken care of, let's set up the metrics.

Pretty easy - copy the libFlurryAnalytics.a into the project, copy the FlurryAnalytics.h into the app delegate implementation file, and the start session in the "application:didFinishLaunchingWithOptions method:


[FlurryAnalytics startSession:@"YOUR_KEY_GOES_HERE"];


Ok, that's a wrap. Check out the ads!

Tuesday, November 15, 2011

In-app payment - some example code

So, I'm reviewing the in-app payment code, now that it's implemented, to see more carefully what exactly it all does. This post is basically a listing of all the code needed to implement an in-app purchase.


Note that this is based on an excellent tutorial by Rich Levine at http://www.raywenderlich.com/2797/introduction-to-in-app-purchases.


Another absolute must for anyone doing not just in-app purchases, but app submission with xcode 4 in general, is this great tutorial by Troy Bryant: http://troybrant.net/blog/2010/01/in-app-purchases-a-full-walkthrough/


Let's take a look at all the code: We'll take a look at it from the client perspective first.

Here's the header file:


//
// NextLevelViewController.h
// JlptQuizApp
//
// Created by Mark Donaghue on 9/20/11.
// Copyright 2011 Kanjisoft Systems. All rights reserved.
//

#import

// in app purchase
#import "InAppMyAppIAPHelper.h"
#import "MBProgressHUD.h"


@interface NextLevelViewController : UIViewController {
UIImageView *imageView;
UILabel *upperCongratsMessage;
UILabel *congratsMessage;
UILabel *art_title;
UILabel *url;

UIButton *continueButtton;

// Button to purchase with
UIButton *buyButtton;

// Show whirly progress indicator when waiting for an app purchase
MBProgressHUD *_hud;
}


@property (nonatomic, retain) IBOutlet UIImageView *imageView;
@property (nonatomic, retain) IBOutlet UILabel *congratsMessage;
@property (nonatomic, retain) IBOutlet UILabel *upperCongratsMessage;
@property (nonatomic, retain) IBOutlet UILabel *url;
@property (nonatomic, retain) IBOutlet UILabel *art_title;
@property (nonatomic, retain) IBOutlet UIButton *continueButton;

// In app purchase
@property (nonatomic, retain) IBOutlet UIButton *buyButton;
@property (retain) MBProgressHUD *hud;

- (IBAction)dismissView:(id)sender;

// In app purchase
- (IBAction)buyButtonTapped:(id)sender;

@end


So, essentially we have a buy button, the progress indicator for the purchase, and the declaration of the method method to call when the buy button is tapped.

Now, what do we do in the implementation?

First, we need to import the network status checking class (and my own class utils):

#import "Utils.h"
#import "Reachability.h"

First, we synthesize the stuff declared above:

@synthesize imageView, upperCongratsMessage, congratsMessage, art_title, url, buyButton, continueButton;

@synthesize hud = _hud;


I'm not in love with the convention of naming properties after internally declared variables without the underscore - what's the point? I guess there's a good reason for it - it must have something to do with how synthesize works. I'll figure it out later.

Next, we need to hide the purchase button if it's already been purchased. For that we have this code:


// check whether or not to display the purchase button
- (void) checkPurchaseButton {

if ([Utils isFreeVersion]) {
[buyButton setHidden:NO];

}
else {
[buyButton setHidden:YES];
}

}


This is called from "viewWillAppear". We'll drill into how it checks what's been purchased later on.

In the viewDidLoad, we identify the methods to be called when the app purchase is done, be it success or failure:


// in app purchase - specify what to do when app is purchased
[[NSNotificationCenter defaultCenter] addObserver:self selector:@selector(productPurchased:) name:kProductPurchasedNotification object:nil];
[[NSNotificationCenter defaultCenter] addObserver:self selector: @selector(productPurchaseFailed:) name:kProductPurchaseFailedNotification object: nil];


All you really have to know is this causes the "productPurchased" and the "ProductPurchaseFailed" methods to be called in on a purchase and purchase failure, respectively.

The next method is this:


// Dismiss the swirly progress indicator
- (void)dismissHUD:(id)arg {

[MBProgressHUD hideHUDForView:self.navigationController.view animated:YES];
self.hud = nil;

}


As you might imagine, this is called when the app purchase is completed and dismisses the circly-swirly doodle progress indicator.

This is the purchase button pressed method:


-
- (IBAction)buyButtonTapped:(id)sender {


NSLog(@"NextLevelController, buyButtonTapped");

// needs to be called to set up the products array
[InAppMyAppIAPHelper listProducts];


// This is (currently) a one-product app. Retrieve the only product.
SKProduct *product = [[InAppMyAppIAPHelper sharedHelper].products objectAtIndex:0];


// create object to check for net status
Reachability *reach = [Reachability reachabilityForInternetConnection];

// check for nets status
NetworkStatus netStatus = [reach currentReachabilityStatus];

if (netStatus == NotReachable) {
NSLog(@"Arggh! - no internet connection!");
}

else {

// Display the swirly progress indicator
// this takes care of adding to the view - no need to add to the xlb
self.hud = [MBProgressHUD showHUDAddedTo:self.view animated:YES];

// Text for the progress indicator
_hud.labelText = @"Acessing new vocab...";


NSLog(@"Buying %@...", product.productIdentifier);

// Get the singleton shared helper and purchase. Use the product identifier
// from the product which you got from the products array a few lines ago
[[InAppMyAppIAPHelper sharedHelper] buyProductIdentifier:product.productIdentifier];

// call method named "timeout" ofter delay specified
[self performSelector:@selector(timeout:) withObject:nil afterDelay:60*5];

}
}


We'll delve back into this after we finish listing the client code. The next method is the callback for the product purchased:


// Handle product purchase
- (void)productPurchased:(NSNotification *)notification {

// Drop any previous requests
[NSObject cancelPreviousPerformRequestsWithTarget:self];

// Get rid of the swirly-doodle progress indicator
[MBProgressHUD hideHUDForView:self.view animated:YES];

// Get the product identified
NSString *productIdentifier = (NSString *) notification.object;


NSLog(@"Purchased: %@", productIdentifier);


// hide the purchase button
[self checkPurchaseButton];


}


And the purchase fail:

// Handle product purchase fail
- (void)productPurchaseFailed:(NSNotification *)notification {

NSLog(@"NextLevelViewContoller - productPurchase failed");

// Drop any previous requests
[NSObject cancelPreviousPerformRequestsWithTarget:self];

// Get rid of the swirly-doodle progress indicator
[MBProgressHUD hideHUDForView:self.view animated:YES];


// Grab the transaction from the notification
SKPaymentTransaction * transaction = (SKPaymentTransaction *) notification.object;

// Show an alert with info about the reason for failure
// as long as it's other than the (user-ititiated cancel?)

if (transaction.error.code != SKErrorPaymentCancelled) {

UIAlertView *alert = [[[UIAlertView alloc] initWithTitle:@"Error!"
message:transaction.error.localizedDescription
delegate:nil
cancelButtonTitle:nil
otherButtonTitles:@"OK", nil] autorelease];

// show the alert
[alert show];
}

}


Finally, we have the code to display the timeout:

// Process a purchase timeout
- (void)timeout:(id)arg {

// set the swirly-gig-doodle progress indicator text
_hud.labelText = @"Timeout!";

// Give some hopeful advice
_hud.detailsLabelText = @"Please try again later.";

// set an image on the the swirly-gig-doodle progress indicator
_hud.customView = [[[UIImageView alloc] initWithImage:[UIImage imageNamed:@"37x-Checkmark.jpg"]] autorelease];

// Set the swirly-gig-doodle progress indicator to show the image
_hud.mode = MBProgressHUDModeCustomView;

// Drop the timeout display after a delay
[self performSelector:@selector(dismissHUD:) withObject:nil afterDelay:3.0];

}

Ok, we promised we'd take a look at the objects which actually perform the purchase. This is done through the use of the In-App Purchase helper class and its app-specific subclass. Since it's shorter, let's look at the subclass first. Here's the header:

#import
#import "IAPHelper.h"

@interface InAppMyAppIAPHelper : IAPHelper {
}

+ (InAppMyAppIAPHelper *) sharedHelper;

+ (void) listProducts;

@end


It's pretty straightforward. There are static declarations of two methods. The first provides a singleton instance of itself, and the second is a utility method to list the products.

Here's the implementation:

#import "InAppMyAppIAPHelper.h"

@implementation InAppMyAppIAPHelper

// Singleton instance of self
static InAppMyAppIAPHelper * _sharedHelper;


// Return the singleton instance of self
+ (InAppMyAppIAPHelper *) sharedHelper {

// return it if it's been instantiated already
if (_sharedHelper != nil) {
return _sharedHelper;
}

// It's not yet been created, so go ahead and create it
_sharedHelper = [[InAppMyAppIAPHelper alloc] init];

// and return it
return _sharedHelper;

}


// initialize
- (id)init {

// create a list of product identifier
NSSet *productIdentifiers = [NSSet setWithObjects:
@"com.kanjisoft.JlptVocabularyQuiz.AdditionalVocab",
nil];

// invoke superclass's method, which iterates through this list, checks
// NSPrefs, and if it's been purchased, add it to the "productsPurchased array
if ((self = [super initWithProductIdentifiers:productIdentifiers])) {

}

// done
return self;

}

// Method to list products

+ (void) listProducts {

// retreive the count of products
int productsCount = [[InAppMyAppIAPHelper sharedHelper].products count];

// Log a message if it's zero
if (productsCount == 0) {
NSLog(@"InAppMyAppAPHelper, productCount was zero: %d", productsCount);
}


// Iterate through the product list
for (int i = 0; i < productsCount; i++) {

// get the product
SKProduct *product = [[InAppMyAppIAPHelper sharedHelper].products objectAtIndex:i];

// allocate a number formatter
NSNumberFormatter *numberFormatter = [[NSNumberFormatter alloc] init];

// No idea what 10_4 is
[numberFormatter setFormatterBehavior:NSNumberFormatterBehavior10_4];

// Set the style to currency
[numberFormatter setNumberStyle:NSNumberFormatterCurrencyStyle];

// Set the locale to the price locale
[numberFormatter setLocale:product.priceLocale];

// formate the price string
NSString *formattedString = [numberFormatter stringFromNumber:product.price];

// release the formatter
[numberFormatter release];

// log the info
NSLog(@"product title: %@", product.localizedTitle);

NSLog(@"product cost: %@", formattedString);


// check against the purchase producst array and log wheter it was
// purchased or not
if ([[InAppMyAppIAPHelper sharedHelper].purchasedProducts containsObject:product.productIdentifier]) {
NSLog(@"product was purchased");

} else
{
NSLog(@"product was *not* purchased");

}

}

}


@end


Ok, let's look at the big kahouna - the IAPHelper class.


Here's the interface:

//
// IAPHelper.h
// JlptVocabularyQuiz
//
// Created by Mark Donaghue on 10/28/11.
// Copyright 2011 Kanjisoft Systems. All rights reserved.
//

#import
#import "StoreKit/StoreKit.h"

#define kProductsLoadedNotification @"ProductsLoaded"
// Add two new notifications
#define kProductPurchasedNotification @"ProductPurchased"
#define kProductPurchaseFailedNotification @"ProductPurchaseFailed"


@interface IAPHelper : NSObject {

// Set of product ids, provided by the app specific subclass.
NSSet * _productIdentifiers;

// list of all products, purchased or not
NSArray * _products;

// list of purchase products, created by checking against prefs
NSMutableSet * _purchasedProducts;

// In app purchase use
SKProductsRequest * _request;
}

@property (retain) NSSet *productIdentifiers;
@property (retain) NSArray *products;
@property (retain) NSMutableSet *purchasedProducts;
@property (retain) SKProductsRequest *request;

// get a list of products
- (void)requestProducts;

// create the list of purchased products
- (id)initWithProductIdentifiers:(NSSet *)productIdentifiers;

// buy the product
- (void)buyProductIdentifier:(NSString *)productIdentifier;

@end


Pretty self-explanatory. And finally, the implementation:


//
// IAPHelper.m
// JlptVocabularyQuiz
//
// Created by Mark Donaghue on 10/28/11.
// Copyright 2011 Kanjisoft Systems. All rights reserved.
//

#import "IAPHelper.h"


@implementation IAPHelper

// Under @implementation
@synthesize productIdentifiers = _productIdentifiers;
@synthesize products = _products;
@synthesize purchasedProducts = _purchasedProducts;
@synthesize request = _request;


// In dealloc
- (void)dealloc
{
[_productIdentifiers release];
_productIdentifiers = nil;
[_products release];
_products = nil;
[_purchasedProducts release];
_purchasedProducts = nil;
[_request release];
_request = nil;
[super dealloc];
}


// Request a list of products from app store

- (void)requestProducts {

// Create a requestt for a list of products, using the list
// of product identifiers as a parameter
self.request = [[[SKProductsRequest alloc] initWithProductIdentifiers:_productIdentifiers] autorelease];

// this instance is the delegate for the request object
_request.delegate = self;

// start the request
[_request start];

}


// receives response for the request with the listing of products

- (void)productsRequest:(SKProductsRequest *)request didReceiveResponse:(SKProductsResponse *)response {


// set the list of products to the list of product objects received in the response
self.products = response.products;

// nil out the request
self.request = nil;


// log the products received
for (id product in _products){
NSLog(@"IAHelper, received product is: %@", product);
}


// notify methods set up on the notification center of the product's receipt
[[NSNotificationCenter defaultCenter] postNotificationName:kProductsLoadedNotification object:_products];
}


// invoked from the app-specific subclasss, which provides
// a list of the product ids
- (id)initWithProductIdentifiers:(NSSet *)productIdentifiers {

// self to super
if ((self = [super init])) {

// Store product identifiers recieved from the subclass
_productIdentifiers = [productIdentifiers retain];


// Check for previously purchased products
NSMutableSet * purchasedProducts = [NSMutableSet set];

// iterate through the product identifiers
for (NSString * productIdentifier in _productIdentifiers) {

// see if the product id is in prefs
BOOL productPurchased = [[NSUserDefaults standardUserDefaults] boolForKey:productIdentifier];

// if it is
if (productPurchased) {

// add it to the list of purchase products
[purchasedProducts addObject:productIdentifier];

// log it
NSLog(@"Previously purchased: %@", productIdentifier);
}
else {

// log that it's not in the list of purchased products
NSLog(@"Not purchased: %@", productIdentifier);
}
}

// set the purchased products array
self.purchasedProducts = purchasedProducts;

}
return self;
}


- (void)recordTransaction:(SKPaymentTransaction *)transaction {
// Optional: Record the transaction on the server side...
}


// look like this is called when the product is purchased
- (void)provideContent:(NSString *)productIdentifier {

NSLog(@"Toggling flag for: %@", productIdentifier);

// set prefs to true for the product id
[[NSUserDefaults standardUserDefaults] setBool:TRUE forKey:productIdentifier];

// save it
[[NSUserDefaults standardUserDefaults] synchronize];

// add it to the list of purchase prodcut
[_purchasedProducts addObject:productIdentifier];


// float the notification of the product purchase
[[NSNotificationCenter defaultCenter] postNotificationName:kProductPurchasedNotification object:productIdentifier];

}


// call back from purchase
- (void)completeTransaction:(SKPaymentTransaction *)transaction {

NSLog(@"completeTransaction...");

// call the optional record transaction
[self recordTransaction: transaction];

// add it to the list of products purchase
[self provideContent: transaction.payment.productIdentifier];

// set the transaction to finished
[[SKPaymentQueue defaultQueue] finishTransaction: transaction];

}

// restore transaction
- (void)restoreTransaction:(SKPaymentTransaction *)transaction {

NSLog(@"restoreTransaction...");

[self recordTransaction: transaction];
[self provideContent: transaction.originalTransaction.payment.productIdentifier];
[[SKPaymentQueue defaultQueue] finishTransaction: transaction];

}


// transaction failed
- (void)failedTransaction:(SKPaymentTransaction *)transaction {

if (transaction.error.code != SKErrorPaymentCancelled)
{
NSLog(@"Transaction error: %@", transaction.error.localizedDescription);
}

[[NSNotificationCenter defaultCenter] postNotificationName:kProductPurchaseFailedNotification object:transaction];

[[SKPaymentQueue defaultQueue] finishTransaction: transaction];

}


// add transaction to the payment queue
- (void)paymentQueue:(SKPaymentQueue *)queue updatedTransactions:(NSArray *)transactions
{
for (SKPaymentTransaction *transaction in transactions)
{
switch (transaction.transactionState)
{
case SKPaymentTransactionStatePurchased:
[self completeTransaction:transaction];
break;
case SKPaymentTransactionStateFailed:
[self failedTransaction:transaction];
break;
case SKPaymentTransactionStateRestored:
[self restoreTransaction:transaction];
default:
break;
}
}
}


// purchase the product
- (void)buyProductIdentifier:(NSString *)productIdentifier {

NSLog(@"Buying %@...", productIdentifier);

SKPayment *payment = [SKPayment paymentWithProductIdentifier:productIdentifier];

[[SKPaymentQueue defaultQueue] addPayment:payment];

}

@end


Ok, that's it.

Monday, November 14, 2011

Jonathan Stark's Phone Gap tutorial - Ch03 - part 3

Ok, moving on with Jonathan Stark's tutorial. In this post, we're going to implement the javascript required to create a button. You can see the tutorial for an explanation. Don't forget to change the domain name to your own! If you don't have one, get one. They're cheap, and I had better luck with it than using the "file://". But that's maybe just me. Here's the javascript.

var hist = [];
var startUrl = 'index.html';
$(document).ready(function(){
loadPage(startUrl);
});
function loadPage(url) {
$('body').append('
Loading...
');
scrollTo(0,0);
if (url == startUrl) {
var element = ' #header ul';
} else {
var element = ' #content';
}
$('#container').load(url + element, function(){
var title = $('h2').html() || 'Hello!';
$('h1').html(title);
$('h2').remove();
$('.leftButton').remove();
hist.unshift({'url':url, 'title':title});
if (hist.length > 1) {
$('#header').append('
'+hist[1].title+'
');
$('#header .leftButton').click(function(){
var thisPage = hist.shift();
var previousPage = hist.shift();
loadPage(previousPage.url);
});
}
$('#container a').click(function(e){
var url = e.target.href;
if (url.match(/jonathanstark.com/)) {
e.preventDefault();
loadPage(url);
}
});
$('#progress').remove();
});
}

When you run it, it works - there's some text that appears that corresponds to the back button and actually works. Here's what you should see:


However, the "button" really needs to look like a button. That's where the css for the button comes in:

Example 3.11. Add the following to iphone.css to beautify the back button with a border image


#header div.leftButton {
font-weight: bold;
text-align: center;
line-height: 28px;
color: white;
text-shadow: rgba(0,0,0,0.6) 0px -1px 0px;
position: absolute;
top: 7px;
left: 6px;
max-width: 50px;
white-space: nowrap;
overflow: hidden;
text-overflow: ellipsis;
border-width: 0 8px 0 14px;
-webkit-border-image: url(images/back_button.png) 0 8 0 14;
}


I think the line height might be the height of the text, not sure though. The shadow is black with an alpha (transparency) of .6. There's some description of them in the tutorial.


And now you get a nice, iPhone-ish looking back button:


The tutorial has a nice image which shows the undesirable gray box that appears over the back button when you highlight it (trying holding the button down to get a good look at it).

To get rid of that effect, all you have to do is add the following line to the css:

-webkit-tap-highlight-color: rgba(0,0,0,0);

And the effect disappears. Note that I had to start my iOS to have the change take effect - something which has occurred several times.

To get a darker effect when the button is clicked, first add this to the css:

#header div.leftButton.clicked {
-webkit-border-image: url(images/back_button_clicked.png) 0 8 0 14;
}


Then, add add the "clicked" line to the javascript:

$('#header .leftButton').click(function(e){
$(e.target).addClass('clicked'); <==== add this
var thisPage = hist.shift();
var previousPage = hist.shift();
loadPage(previousPage.url);
});

I'm having a tough time spotting this, but maybe when I try it on the iPod touch.

Note - make sure you put the "e" in there!

Ok, that wraps up this part. We'll hopefully finish up chapter 3 on the next go-round.

Jonathan Stark's Phone Gap tutorial - Ch03 - part 2

Today we continue to walk through Chapter 3 of Jonathan Stark's tutorial on creating iPhone apps without objective C.

Picking up where we left off, the next step is to only "hijack" links to your own site. If there's a link to an different site, you want to allow it to work normally. This is done by adding these lines to the hijack_links method:

var url = e.target.href;
if (url.match(/jonathanstark.com/)) {
//...execute the preventDefault and the load paghe

So now the method looks like something like this:

function hijackLinks() {
$('#container a').click(function(e){
var url = e.target.href;
if (url.match(/kanjisoft.com/)) {
e.preventDefault();
loadPage(e.target.href);
}
});
$('h1').html(title);
$('h2').remove();
$('#progress').remove();
}


So, to test this, we can add some external links and make sure they work. Let's modify lines development.html to include some links in the content section:

<div id="content">
<ul>
<li><a href="about.html">About</a></li>
<li><a href="blog.html">Blog</a></li>
</ul>

<h2>Development</h2>
<p>Lorem ipsum dolor sit amet, consectetur adipisicing elit, sed do eiusmod tempor incididunt ut labore et dolore magna aliqua. Ut enim ad minim veniam, quis nostrud exercitation ullamco laboris nisi ut aliquip ex ea commodo consequat. Duis aute irure dolor in reprehenderit in voluptate velit esse cillum dolore eu fugiat nulla pariatur. Excepteur sint occaecat cupidatat non proident, sunt in culpa qui officia deserunt mollit anim id est laborum.</p>
</div>


This get the following page:


If you click on the links, it just takes you to the respective page on your site. Now, let's change the "blog" link to be a google link:


<li><a href="http://www.google.com">Google</a></li>


So, it looks like this:


And if we click on it, we get the normal Google page:


That's it for now. We'll keep on going with chapter three in the next post.

Saturday, November 12, 2011

Walking through Jonathan Stark's Phone Gap tutorial - Ch03

Here's Chapter 3.

Important point, *easy to miss*: iphone.html is the code you need to be invoking from the browser, not index.html. It uses javascript to invoke index.html.

Huge gotcha: the code won't work unless you modify iphone.js to say "mydomain.com" instead of "jonathanstark.com".

Start with the posted html:


<html>
<head>
<title>Jonathan Stark</title>
<meta name="viewport" content="user-scalable=no, width=device-width" />
<link rel="stylesheet" href="iphone.css" type="text/css" media="screen" />
<script type="text/javascript" src="jquery.js"></script>
<script type="text/javascript" src="iphone.js"></script>
</head>
<body>
<div id="header"><h1>Jonathan Stark</h1></div>
<div id="container"></div>
</body>
</html>


Remember, this is iphone.html. It runs a javascript which loads index html.

Copy the posted code into "iphone.css". It's similar to chapter 2.

Now, create iphone.js with this code:

$(document).ready(function(){
loadPage();
});
function loadPage(url) {
if (url == undefined) {
$('#container').load('index.html #header ul', hijackLinks);
} else {
$('#container').load(url + ' #content', hijackLinks);
}
}
function hijackLinks() {
$('#container a').click(function(e){
e.preventDefault();
loadPage(e.target.href);
});
}


This does two things - first, it copies the area specified by the tags (either #header ul, or #content) into the #container section of iphone.html. It then turns every link into copied into a javascript function.

Note that there are no links to be copied in the #content section of the links, so there will be no links displayed except those from index.html.

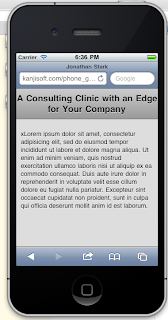
If you run it in the iPhone simulator, it looks like this:


Next, get the "image loading" effect. Add this to the first line of the "loadPage" function:

$('body').append('
Loading...
');


And this to the end of the hijacklinks function:

$('#progress').remove();


When the page loads, you should see a little "Loading..." just below the "Jonathan Stark" header, which should disappear when the page shows up.

The next step is to add the css to make it look prettier...

#progress {
-webkit-border-radius: 10px;
background-color: rgba(0,0,0,.7);
color: white;
font-size: 18px;
font-weight: bold;
height: 80px;
left: 60px;
line-height: 80px;
margin: 0 auto;
position: absolute;
text-align: center;
top: 120px;
width: 200px;
}


The radius rounds the corners of the the box. the background color makes it black with an alpha (transparency) of 70%. The text color is white, it's 60 px from the left. Not sure what the purpose of line-hight and margin are, but they work. Now you should get a nice black box with white text showing up when the page loads.

There's a gotcha in the the next cool trick, which is to take each page's h2 and make the page's h1. Don't be fooled by the use of the word "title", he doesn't mean the html title. You do this by adding these lines just before the progress indicator is removed:

var title = $('h2').html() || 'Hello!';
$('h1').html(title);
$('h2').remove();


Note that if there's no h2, it will show "Hello". You shouldn't be getting that, but I think you might. I did.

Note that it will replace the previous h1 with the old h2, and get rid of the old h2.

This is what you should get. You can see it clearly in the before after at:

http://ofps.oreilly.com/titles/9780596805784/ch03_id35816678.html#beforeMovingHeadingToToolbar

and

http://ofps.oreilly.com/titles/9780596805784/ch03_id35816678.html#afterMovingHeadingToToolbar

See how the about moved up to replace "Jonathan Stark"?

However, if you get the hello, as I did, don't be shocked. I think the problem is that the initial invocation of iphone.html is stays in effect through the substitute command - index.html never gets called. And there is no h2 in iphone.html. The rest of the the links get transferred to by use of the loadPage(e.target.href);


loadPage(e.target.href);


To prevent this, you could do something like set a hidden variable the block that checks for the empty url, and check it later to see of you're on the first page, and if so account for that in the move logic. But, in the interests of moving on, we'll leave it at "hello". It works fine on the linked pages.

The next step is adding an elipse. I'm kind of off track again, because it looks like he's working from the chapter 2 linked pages. But, this is just to demonstrate wrapping, so I'll change the "Consulting Clinic" header to "A Consulting Clinic with an Edge for Your Company"

That leave an image that looks like this:


Add the ellipsis by adding this to the #header ht in the css:


max-width: 160px;
overflow: hidden;
white-space: nowrap;
text-overflow: ellipsis;


Max width is just what it says - a max width. The overflow:hidden means "chop off" and content extend beyond the (max) width. white-space: nowrap prevents wrapping, and of course text overflow ellipsis tells it to create an ellipsis in an overflow situation. Let's check it out:
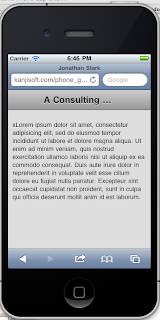


Cool.


The next step is to add this:

scrollTo(0,0);


The reason is, if you are somewhere on a page, and you click a link to get to another page, it will take you to the same section of the new page as the old. Well, it's the same page, iphone.html, and stark suggests this is the reason - you're not going to a new page. The javascript keeps you on the same page. To make this less egregious, you put the scrollto(0,0) command in.

To test this, we could try throwing a bunch of text into a couple of pages, iphone.html and consulting_clinic.html.

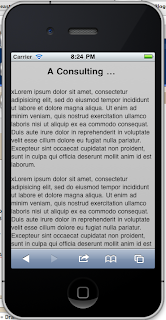
So, before we make the change, the first page load shows this:


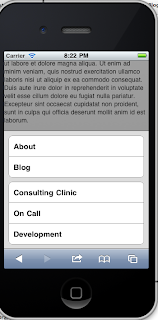
When we link, it goes to the same area of the "new" but really the same page:


And finally after in inserting the (scroll 0,0), and going through the same sequence, we see it's gone to the top of the page:


We'll wrap this up tomorrow.

Tuesday, November 1, 2011

In App Purchase - tracking down an invalid product id

Ok, the "good" news I've actually gotten to the point where I'm receiving an invalid product id from the app store when I try to list the products available. The bad news is that, like the maddening "invalid binary" on app submission, there is no indication what soever of *why* the effing product id is invalid. Apple ... never mind.

Luckily, there is one man attempting to help this situation out. It's Troy Brant (I guess that's his name) on troybrant.net. He's made a list of possible cause of this error at

http://troybrant.net/blog/2010/01/invalid-product-ids/

Here's the list:

Have you enabled In-App Purchases for your App ID?

// Uhmmm...huh? Did I? Probably, let's check out iTunesConnect. Hmmmm don't see
// anything there. Let's get back to this.


Have you checked Cleared for Sale for your product?

// Yes. that's checked.


Have you submitted (and optionally rejected) your application binary?

// Yes, it's int developer rejected status

Does your project’s .plist Bundle ID match your App ID?

// This is a confusing question. My bundle id on itunes is com.myapp.myprofile
// This matches my entry in the plist. However on iTunes the app id is some number
// also, if you look in the the binary info on itunes, you see info under entitlements
// which includes something under "keychain access" that looks like an app id
// (the com.mycompany.myapp style) but is preceded with a some big alphanumeric number.


Have you generated and installed a new provisioning profile for the new App ID?

// Yes, I'm just about positive.

Have you configured your project to code sign using this new provisioning profile?

// Yes, I'm sure I went through that process.

Are you building for iPhone OS 3.0 or above?

// Yes, 4.3.3

Are you using the full product ID when when making an SKProductRequest?


// does this include the number? But yes I think I am.

Have you waited several hours since adding your product to iTunes Connect?

// Yes, many hours.

Are your bank details active on iTunes Connect? (via Mark)

// Yes

Have you tried deleting the app from your device and reinstalling? (via Hector, S3B, Alex O, Joe, and Alberto)

This worked??? My God, it worked. Thank you, Hector, S3B, Alex O, Joe, and Alberto and of course Troy!


Is your device jailbroken? If so, you need to revert the jailbreak for IAP to work. (via oh my god, Roman, and xfze)

We'll tackle that in the next post.